It’s not the cute fonts that matter, it’s the content.
Wow! Look, mom, no custom fonts eating up my bandwidth and page load times anymore!
Yes, custom fonts are cool, but in our age of instant gratification, are they really worth the load times?
Sure, I was loading the custom fonts downloaded directly from Google with the convenient create-block-theme plugin, but are all the font files really worth the load times? I had 4 custom font families that I imported with the create-block-theme plugin for headings, body copy, and code blocks with a few different font weights for each font, and each different font weight file is a separate request from the server, causing more requests and load time.
You can bring your own fonts from now on
Unless there is a specific client request, I’m choosing to use the most popular native operating system fonts my own web projects. Hello, Arial, Helvetica and sans-serif.
Nowadays, people want their information as fast as possible because we all just have so much going on. There is no time to wait for 764kB of cute fonts to download while Tim is playing Halo in the other room and Jerry is streaming bicycle prank videos on YouTube! Just give me the content. It’s my content and I want it NOW!
Think of the time you will save users when you spare them from loading up Libre Franklin, Raleway, Roboto, Source Code Pro, and whatever other gnarly fonts you find. Not everyone is on Google Fiber internet, ya know.
Native font stacks to the rescue
It’s time to use CSSFontStack.com -> A complete collection of web safe CSS font stacks. Goodbye, web fonts!
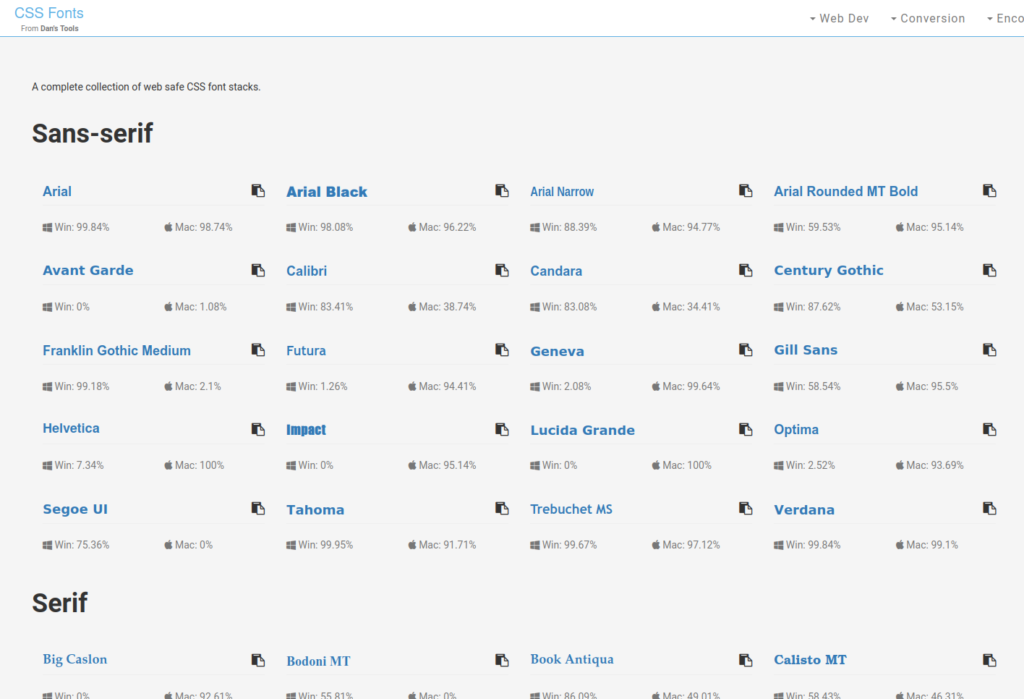
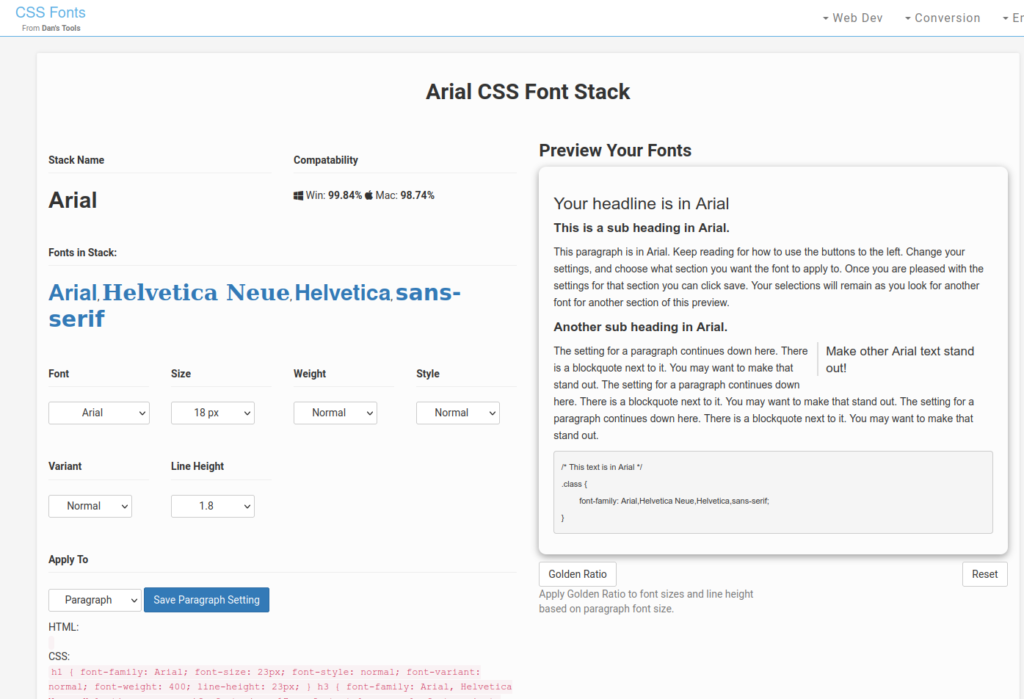
I’m going to simply use the Arial font stack because it is highly compatible with various operating systems. To simply apply the Arial font stack to your entire page, we could easily paste the font-family stack into the body selector in our CSS file like the example below.
body {
  font-family: Arial, "Helvetica Neue", Helvetica, sans-serif;
}
According to CSS Font Stack, the Arial font stack will enable nearly 100% of users to read your site perfectly fine while using an operating system font they are familiar with and also saving them hundreds of kilobytes of data! If users mostly do reading on your website or blog, they will thank you for getting to the point and skipping the fancy stuff.
How to apply the Arial font stack to my custom WordPress block theme.json file:
Adding the body style declaration to the WordPress theme style.css file is the old way to do WordPress style changes. Welp, it’s time to do it the new way in my theme.json file now.
theme.json is quite particular
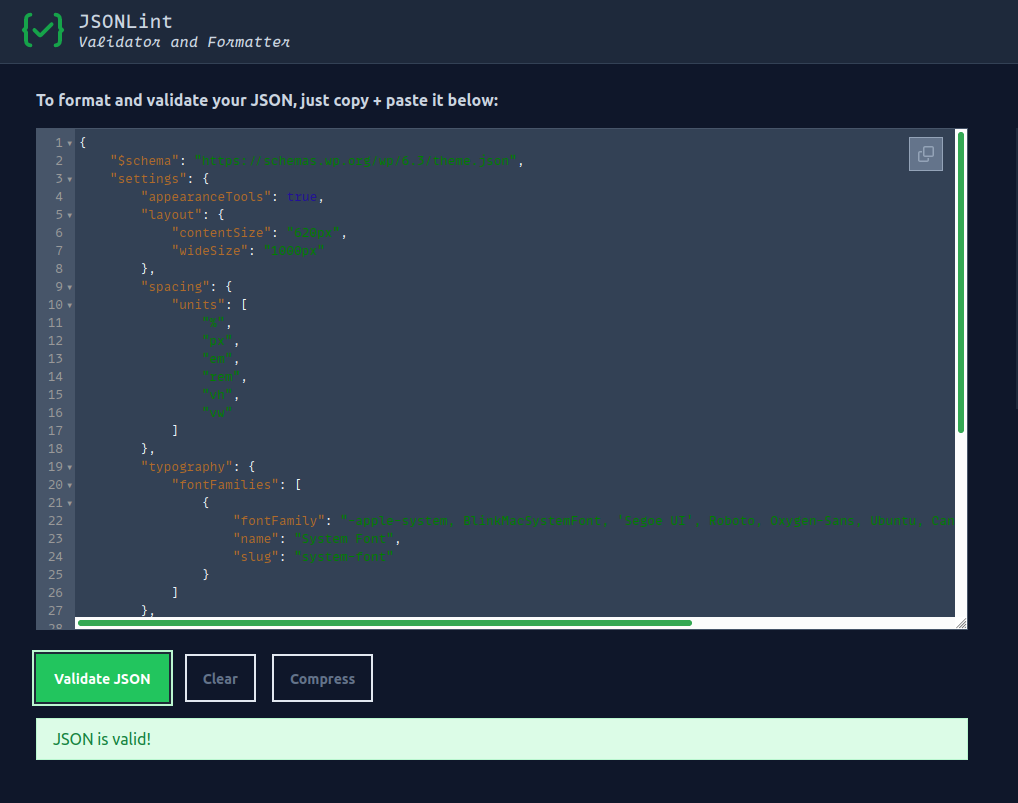
The theme.json file won’t work properly if the JSON formatting is incorrect, such as an unnecessary trailing comma in the JSON code structure. This can be a pain because WordPress doesn’t give you much feedback when your theme.json file is messed up, except from deactivating all of your theme.json custom styles.
That’s how you’ll know if your theme.json is working, because all the custom JSON stuff you made will not work anymore. Once this happens, it’s time to run your JSON code through a code linter like JSONLint.com and read any error messages to help fix your code. JSONLint.com also helps compress (minify) or prettify (format) your code, which is really convenient.
Finally, how to change the font in theme.json to the Arial font stack
In theme.json, we need to modify the typography settings and then the style settings. You can add several font family stacks inside the typography settings if you want, but for my purpose I’m only adding my native Arial font stack to keep things minimal.
After we configure the typography settings, we need to configure the style settings and basically add our font to our elements so it actually shows up on headings and text.
Below is my current theme.json code, which I have modified and inserted my web safe Arial font stack from CSSFontStack.com. I’ve added the typography.fontFamilies block and the styles blocks to activate the font stack. The JSON code can get quite complex and nested, but I’ve found that it’s not that difficult to navigate through the different sections once you get the hang of it. Code folding hotkeys in Sublime Text have been a big help! CTRL + SHIFT + [ is a blessing.
theme.json code
{
	"$schema": "https://schemas.wp.org/wp/6.3/theme.json",
	"settings": {
		"appearanceTools": true,
		"color": {
			"background": true,
			"custom": true,
			"customDuotone": true,
			"customGradient": true,
			"defaultDuotone": true,
			"defaultGradients": true,
			"defaultPalette": true,
			"duotone": [],
			"gradients": [],
			"palette": [
				{
					"color": "#fff",
					"name": "Base",
					"slug": "base"
				},
				{
					"color": "#000",
					"name": "Contrast",
					"slug": "contrast"
				},
				{
					"color": "#ff0",
					"name": "Primary",
					"slug": "primary"
				},
				{
					"color": "#00f",
					"name": "Secondary",
					"slug": "secondary"
				},
				{
					"color": "#f00",
					"name": "Tertiary",
					"slug": "tertiary"
				}
			],
			"text": true
		},
		"layout": {
			"contentSize": "960px",
			"wideSize": "100%"
		},
		"shadow": {
			"defaultPresets": true,
			"presets": []
		},
		"spacing": {
			"margin": true,
			"padding": true,
			"customSpacingSize": true,
			"spacingScale": {
				"increment": 1.5,
				"mediumStep": 1.5,
				"operator": "*",
				"steps": 7,
				"unit": "rem"
			},
			"spacingSizes": [],
			"units": [
				"%",
				"px",
				"em",
				"rem",
				"vh",
				"vw"
			]
		},
		"typography": {
			"customFontSize": false,
			"dropCap": true,
			"fluid": true,
			"fontFamilies": [
				{
					"fontFamily": "-apple-system, BlinkMacSystemFont, 'Segoe UI', Roboto, Oxygen-Sans, Ubuntu, Cantarell, 'Helvetica Neue', sans-serif",
					"name": "System Font",
					"slug": "system-font"
				},
				{
					"fontFamily": "Arial, \"Helvetica Neue\", Helvetica, sans-serif",
					"name": "Arial Web Safe Stack",
					"slug": "arial-web-safe",
					"source": "theme"
				},
				{
					"fontFamily": "ui-rounded, 'Hiragino Maru Gothic ProN', Quicksand, Comfortaa, Manjari, 'Arial Rounded MT', 'Arial Rounded MT Bold', Calibri, source-sans-pro, sans-serif",
					"name": "Rounded Sans",
					"slug": "rounded-sans",
					"source": "theme"
				},
				{
					"fontFamily": "'Iowan Old Style', 'Palatino Linotype', 'URW Palladio L', P052, serif",
					"name": "Old Style",
					"slug": "old-style",
					"source": "theme"
				}
			],
			"fontSizes": [
				{
					"fluid": {
						"max": "0.75rem",
						"min": "0.66rem"
					},
					"size": "0.75rem",
					"slug": "x-small"
				},
				{
					"fluid": {
						"max": "1rem",
						"min": "0.875rem"
					},
					"size": "1rem",
					"slug": "small"
				},
				{
					"fluid": {
						"max": "1.33rem",
						"min": "1rem"
					},
					"size": "1.33rem",
					"slug": "medium"
				},
				{
					"fluid": {
						"max": "1.875rem",
						"min": "1.75rem"
					},
					"size": "1.777rem",
					"slug": "large"
				},
				{
					"fluid": false,
					"size": "2.369rem",
					"slug": "x-large"
				},
				{
					"fluid": {
						"max": "3.333rem",
						"min": "2.369rem"
					},
					"size": "3.157rem",
					"slug": "xx-large"
				}
			],
			"fontStyle": true,
			"fontWeight": true,
			"letterSpacing": true,
			"textDecoration": true,
			"textTransform": true
		},
		"useRootPaddingAwareAlignments": true
	},
	"styles": {
		"blocks": {
			"core/code": {
				"typography": {
					"fontSize": "1rem",
					"lineHeight": 1.4
				}
			},
			"core/navigation": {
				"css": "",
				"elements": {
					"link": {
						":active": {
							"typography": {
								"textDecoration": "none"
							}
						},
						":focus": {
							"typography": {
								"textDecoration": "underline dashed"
							}
						},
						":hover": {
							"typography": {
								"textDecoration": "underline"
							}
						},
						"typography": {
							"textDecoration": "none"
						}
					}
				},
				"typography": {
					"fontSize": "var(--wp--preset--font-size--small)"
				}
			}
		},
		"color": {
			"background": "var(--wp--preset--color--base)",
			"text": "var(--wp--preset--color--contrast)"
		},
		"css": "",
		"elements": {
			"button": {
				":active": {
					"color": {
						"background": "var(--wp--preset--color--secondary)",
						"text": "var(--wp--preset--color--base)"
					}
				},
				":focus": {
					"color": {
						"background": "var(--wp--preset--color--contrast)",
						"text": "var(--wp--preset--color--base)"
					}
				},
				":hover": {
					"color": {
						"background": "var(--wp--preset--color--contrast)",
						"text": "var(--wp--preset--color--base)"
					}
				},
				":visited": {
					"color": {
						"text": "var(--wp--preset--color--contrast)"
					}
				},
				"border": {
					"radius": "0"
				},
				"color": {
					"background": "var(--wp--preset--color--primary)",
					"text": "var(--wp--preset--color--contrast)"
				},
				"typography": {
					"fontFamily": "var(--wp--preset--font-family--raleway)"
				}
			},
			"caption": {
				"typography": {
					"fontFamily": "var(--wp--preset--font-family--pt-sans)"
				}
			},
			"h1": {
				"typography": {
					"fontSize": "var(--wp--preset--font-size--xx-large)"
				}
			},
			"h2": {
				"typography": {
					"fontSize": "var(--wp--preset--font-size--x-large)"
				}
			},
			"h3": {
				"typography": {
					"fontSize": "var(--wp--preset--font-size--large)",
					"fontStyle": "normal",
					"fontWeight": "700"
				}
			},
			"h4": {
				"typography": {
					"fontSize": "var(--wp--preset--font-size--medium)",
					"fontStyle": "normal",
					"fontWeight": "400"
				}
			},
			"h5": {
				"typography": {
					"fontSize": "var(--wp--preset--font-size--medium)",
					"fontStyle": "normal",
					"fontWeight": "400"
				}
			},
			"h6": {
				"typography": {
					"fontSize": "var(--wp--preset--font-size--small)",
					"fontStyle": "normal",
					"fontWeight": "400"
				}
			},
			"heading": {
				"typography": {
					"fontFamily": "var(--wp--preset--font-family--raleway)",
					"fontStyle": "normal",
					"fontWeight": "900",
					"lineHeight": 1.6
				}
			},
			"link": {
				":active": {
					"color": {
						"text": "var(--wp--preset--color--secondary)"
					},
					"typography": {
						"textDecoration": "none"
					}
				},
				":focus": {
					"typography": {
						"textDecoration": "underline dashed"
					}
				},
				":hover": {
					"typography": {
						"textDecoration": "none"
					}
				},
				"color": {
					"text": "var(--wp--preset--color--contrast)"
				},
				"typography": {
					"textDecoration": "none"
				}
			}
		},
		"spacing": {
			"blockGap": "0",
			"margin": {
				"bottom": "0",
				"left": "0",
				"right": "0",
				"top": "0"
			},
			"padding": {
				"bottom": "0",
				"left": "0",
				"right": "0",
				"top": "0"
			}
		},
		"typography": {
			"fontFamily": "var(--wp--preset--font-family--arial-web-safe)",
			"fontSize": "var(--wp--preset--font-size--medium)",
			"fontStyle": "normal",
			"fontWeight": "400",
			"lineHeight": "1.66"
		}
	},
	"templateParts": [
		{
			"area": "header",
			"name": "header"
		},
		{
			"area": "footer",
			"name": "footer"
		}
	],
	"version": 2
}You could paste the typography brackets block inside your main “settings”: { } block in your theme.json file if you wanted to change the default font to Arial on your theme. Don’t forget to wrap fonts that have blank spaces in them with single quotes for better CSS.
I’ve been digging into theme.json quite a bit in other projects, so I’m excited to make my own theme.json file much more robust in the near future!
While digging around, I came across another website for using some more modern operating system based font stacks. If the generic web safe Arial font stacks are too bland for you, try Modern Font Stacks for a bit more spice. I added a couple more fonts to my theme just for playing around, but in my default typography settings, I’m using the web safe Arial font stack that I made.
My fonts were still not showing after updating my theme.json file! Learn how to actually refresh your theme.json fonts in your WordPress block themes.
I was digging all over the place for certain settings, testing my JSON code with a linter, and trying whatever I could to get these web safe fonts loading properly.
I tried deactivating and reactivating my custom SWD theme.
I tried clearing all my caches and setting script_debug to true in wp-config.php.
None of these things worked, so I kept digging around in the Site Editor.
Finally, I found the font management area in the Site Editor styles panel under Typography. There is a tiny blue “Aa” font icon that you need to click in order to refresh your theme’s fonts. Check out my screenshots below to see exactly where you’ll need to go to activate your new web safe fonts and then remove any old Google fonts you might have previously installed with the create-block-theme plugin. I’ll be removing all the extra fonts I added for playing around and just keeping my custom Arial Web Safe Stack.
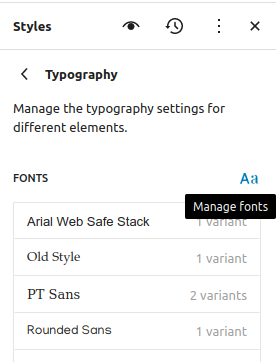
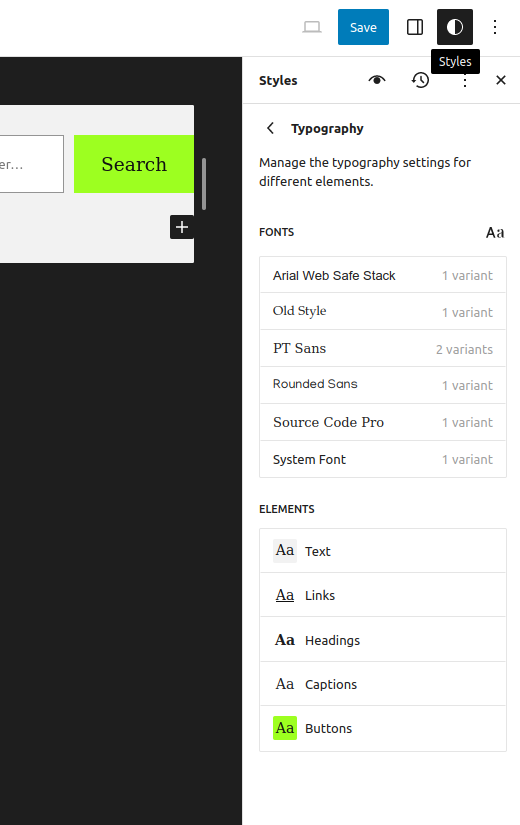
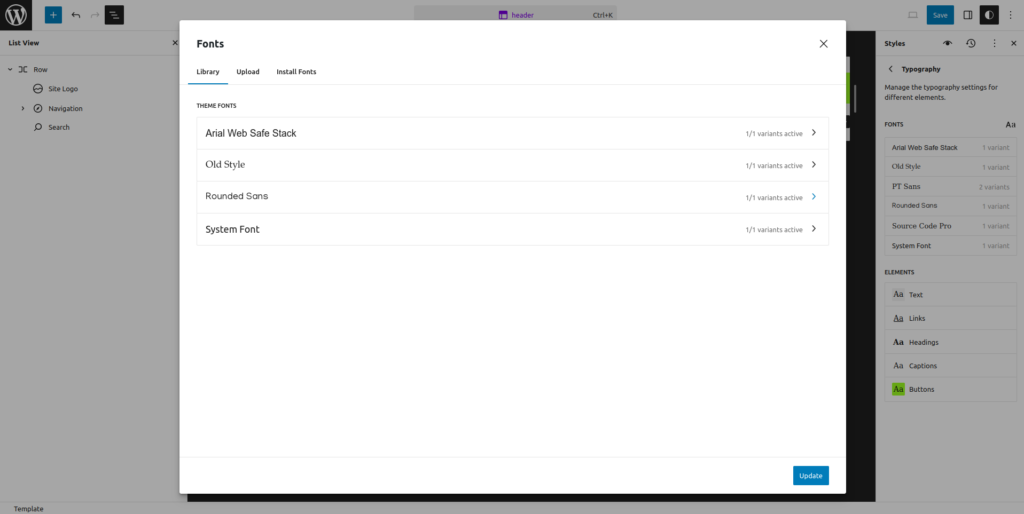
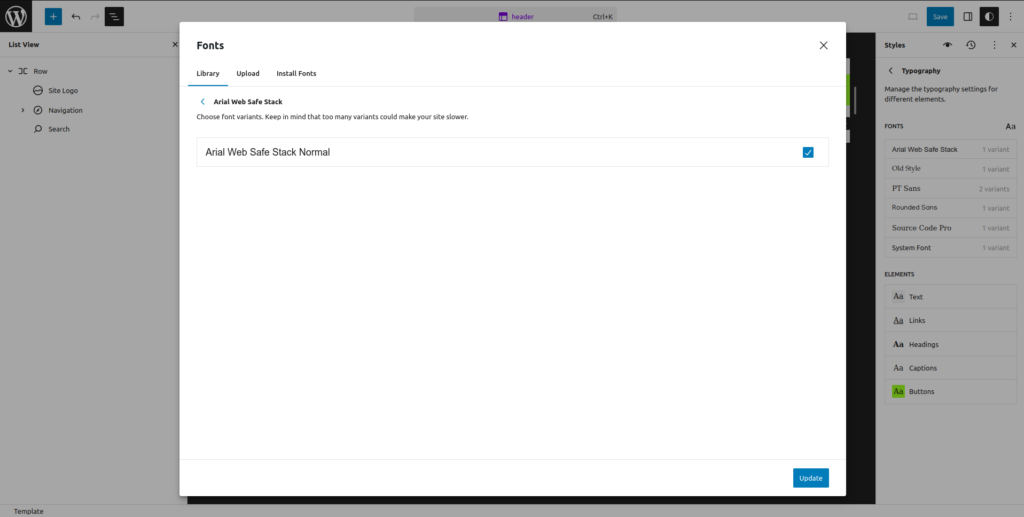
Needless to say, I finally figured it out on my own. It’s so easy to miss that tiny “Aa” icon in the Typography section in order to manage theme fonts.
Perhaps this icon could be emphasized or made to be more intuitive by adding a label that says “Font Manager” or something.





Leave a Reply